The faucet in the bathroom does not work. How to install a bath mixer yourself, with your own hands
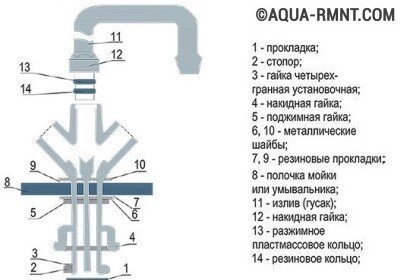
It so happened that our men, and sometimes women, are used to cope with minor home repairs on their own. We ourselves glue wallpapers, repair floors, install plumbing and even lay tiles. And such a trifle as repairing a mixer with your own hands is affordable for almost everyone. If 10 years ago in all the houses and apartments of our immense homeland there were faucets of the same design, then their current variety can confuse even an experienced home craftsman. Let's look at what faucets today are presented on the shelves of our stores and what to do if you suddenly flowed where it should not.
Ball valve - the most popular option
The most common mixer design today is the ball valve. It is a mechanism with one rotary handle. When the handle moves up and down, the pressure of the water is regulated, to the right and left is its temperature. The popularity of such a device is explained not only by the simplicity and convenience of its operation, but also by increased reliability.
Single lever mixer
In order to answer the question “how to repair a ball mixer”, you need to understand how the system works. This is how the ball valve looks in section.
The scheme of a single lever mixer in the context, where: 1.Decorative cap with the designation of hot and cold water; 2.screw; 3.Stock adjustment; 4. Hollow ball for mixing water; 5. The saddle is rubber; 6. Adjustment ring; 7. Steam cuff; 8. Adjusting cuff; 9. Issue of cold and hot water; 10. Mixed release; 11. The sleeve is spherical; 12.Aerator
The main difficulty in repairing such a mixer is that most of its parts are part of a non-separable cartridge. This means that replacing them individually will not work - you will have to change the cartridge completely.
In our next article, you will learn how to replace the cartridge in the mixer yourself:.
Causes of malfunctions and solutions
There may be several causes of trouble:
Body crack
Before you fix the mixer, you need to carefully examine the body of the product, if you find a crack or chip, you can try to eliminate it with sealant. However, this temporary and cracked mixer will still have to be changed.
Gasket wear
If the case is intact, you will have to remove the mixer. To do this, you need to make a number of preliminary measures:
- We block the valves on the pipes of hot and cold water;
- We open the tap and lower the water;
- We turn off the inlets from the mixer and carefully drain the water into a previously prepared container;
Now you can start dismantling. It is enough to simply unscrew the fixing nut here. In most models of kitchen faucets, it is located under the sink. Carefully inspect the gasket. If it is out of shape or cracked, a replacement is required. A new gasket costs mere pennies, and you can buy it at any hardware store.
Note! It is important to choose the diameter of the gasket. It should go into the groove with some effort.
Cartridge clogging
If the replacement of the gasket did not help, then the case is in the cartridge. Quite often, a mixer of this design “leaks” due to small debris entering its mechanism. In this case, the repair of a single lever mixer with your own hands consists in the complete replacement of the cartridge.

This is done according to the following algorithm:
- We overlap and drain the water;
- We dismantle the mixer;
- Pry off the decorative plug with a knife or screwdriver and remove it;
- We unscrew the screw;
- Remove the lever;
- We take out the cartridge and install a new one in its place;
- We make assembly.
That's all. Now your mixer will definitely work like new.
Aerator blockage
When the water in the bathroom flows in a thin stream, and in the kitchen it beats a powerful stream, there is no need to talk about the fault of the water utility. So if the water pressure drops? The most common and easily eliminated cause of this problem is an aerator blockage.

Check if this is your case is very simple. Unscrew the aerator and open the tap. If the water pressure returned to normal, the culprit was found. It is better to replace a very rusty aerator, but if it is just clogged, it is enough to rinse it, I direct a stream of water to its outer surface. Now we install the part in place and everything is ready.
Clogged water pipe or hose
If simple manipulations with the aerator did not take effect, the pipe or hose is most likely clogged. Quite often, in houses with old metal pipes, rust falling from their inner surface overlaps the cross section, which leads to a drop in pressure in the mixer. The pipe cleaning will help to cope with the problem, but it is better to replace them with plastic ones. The inner surface of modern pipes made of polymers is very smooth and not subject to corrosion, which means that it does not “overgrow”.
If there is no possibility to replace the pipeline yet, arm yourself with a thin “snake” cable, disconnect the pipe from both sides and start cleaning.
Trouble with shower bath switch
Now we turn to the answer to the question of how to repair the faucet in the bathroom if the water supply to the shower stops by itself. The switch lever spontaneously lowers, and water flows only through the tap.
The cause of this malfunction may be the wear of the valve spacers. If only the top gasket is damaged, you do not have to remove the mixer. Since it is impossible to determine this “by eye”, for a start it is worth replacing it, and only then draw conclusions:
- Unscrew the union nut of the hose and remove it;
- With a thin hook or awl we pry the gasket;
- Wet a new gasket with water and install in place;
- We assemble the mixer.
If the failure could not be fixed in this way, you will have to change the lower gasket:
- We block the water;
- Remove the flexible hose by unscrewing the union nut;
- Remove the spout and adapter;
- Remove the switch and remove the eccentric;
- We take out the spool;
With a thin screwdriver or a hook, remove the lower gasket (the upper one has already been replaced);

If the upper spool gasket has already been replaced, you do not need to do this again
- We put on a new gasket, moisten it with water and put the spool back;
- We assemble the mixer.
Note! Spool gaskets are generally not sold separately from the mixer. If the spare rings that came with the mixer are not preserved, they can be made with your own hands from hard rubber 3-4 mm thick.
Two-valve version of the mixer
Despite the emergence of many new technologies, the traditional two-valve models did not completely yield their positions.
The design of a two-valve mixer is quite simple, everyone can figure it out
If this equipment is installed in your home, it will not be superfluous to know how to repair a mixer of this design.
Modern two-valve mixers can fundamentally differ in design. As a rule, the cheapest models are equipped with a worm gear, and the more expensive crane-axle with ceramic discs. The second is more reliable, which means we will pay more attention to the first in this article.
Worm gear repair
So what to do if a worm gear mixer is dripping. Most often, the cause of this trouble is a failed gasket that closes the inlet. Need to replace her. You can buy a new rubber ring in a store or make it yourself from thick rubber. Now we disassemble the mixer and make a replacement.
You need to act according to the following algorithm:
- Turning counterclockwise, unscrew the valve body;
- Remove the gasket and install a new one;
- We wrap fum under the stop edge;
We assemble the mixer.

So look ceramic (left) and rubber (right) gaskets
Now the mixer should work fine. However, it happens that repairing a kitchen faucet with your own hands is effective for only a few days. And then the stream appears again. The cause of such rapid wear can be the roughness of the saddle - the place where the gasket rests. Need to grind it. Sometimes this process is also called a “cutter”, by the name of a special cutter, which must be inserted into the place of the worm gear and scrolled with a drill. When the surface of the "saddle" becomes smooth, you can install a new gasket and no longer worry about its service life.
Elimination of a leak in the crane box
The axle box crane can also be installed in a conventional mixer in place of the worm gear, technologically there are no obstacles to this. The first few years after installation, you can not even look in the direction of the crane - it will not leak.
The design of the ceramic crane is as follows: two discs pressed against each other have through holes. When the faucet is open, the holes match, when it is closed, no. Just like all ingenious.
If after some time such a valve still drips, it is enough to tighten the counter-nut on the body and the problem will be solved.
You will learn about other malfunctions of cranes and their elimination in our next article:.
Even the most reliable taps eventually begin to let water through - they flow or drip. To fix a tap it is not always necessary to call a plumber. Most breakdowns can be fixed on their own. But, before you repair a dripping tap, you need to understand its design and the order of work.
Do it yourself with your own hands
Kinds
Let's start with the definitions. There are taps and taps in the bathroom and in the kitchen. Faucets only supply water, mixers also allow you to adjust its temperature by mixing two streams - cold and hot water. In this article we will talk specifically about cranes and how to repair them. Mixer repair is very similar, but has its own characteristics. By the way, one can read about the repair of single lever mixers.
There are several types of faucets for bathroom or kitchen:

Their device is different, so the repair, even with the same damage, is significantly different. Therefore, each of the species will be considered separately.
Do-it-yourself valve repair
Valves can be called classics of water supply. And, although they are gradually being superseded by new designs, there are still plenty of them. Their internal structure over the decades has not changed. Only the design has changed - it has become more diverse and refined. Today you can find both the most ordinary models and very exotic ones.

Valve Structure
Cranes of this type are still used, as they are simple and reliable, they serve not for years but for decades. If the entire “filling” is of proper quality, all that can fail during this time is gaskets. Their replacement - this is the main way to fix the valve.
Replacing rubber pad
If the valve in the kitchen or in the bathroom continues to drip when the valve is completely closed, the most likely reason is the gasket on the valve that has lost its elasticity (see photo in the next paragraph). She stopped pressing tightly against the saddle, which is why water continues to flow and sometimes the tap does not just drip, but even flows. In this case, repair the tap - replace the gasket. To do this, you need a wrench, or better - an adjustable wrench and a set of gaskets.
Before you repair a dripping tap, turn off the water supply (you can completely, you can only in this thread, if possible). Further, it is worthwhile to make sure that the water is still blocked. Water does not flow - we begin repair. You need a wrench or adjustable wrench. They will need to unscrew the head housing (upper part of the housing).
It is better to work with an adjustable wrench. In order not to damage the surface during the operation, wrap it with a soft cloth, and then attach the key. Unscrewing the head, take out the valve. Now you can replace the gasket or put a new valve. The old one is pinched with something sharp - you can use a screwdriver with a flat blade, you can use an awl, etc.
When choosing a gasket, note that its edges should be beveled at about 45 °, otherwise the plumbing will make noise during operation. If this is not in your arsenal, you can trim the edge with something sharp - a knife or scissors.

If there is no suitable gasket, it can be cut from a sheet of dense rubber (porous does not fit). The thickness of the rubber sheet or gasket is 3.5 mm, the inner diameter is slightly less than the diameter of the stem, the outer one should not protrude. Do not forget about bevelled edges at 45 °.
After installing the gasket, put the valve in place, tighten the head. New models do not require winding on the thread. Moreover, the winding is contraindicated - it can cause a crack in the case. If the old crane of the times of the USSR is being repaired, a tow is laid on the thread, lubricated with packing paste, then screwed. After that, you can gradually turn on the water.
Sometimes the opposite story happens with this gasket on the valve - water does not flow or barely oozes. In this case, the gasket flew off the stem and blocked the flow of water. First, you can try to open / close the tap a couple of times, and if it does not help, you need to repeat the above operation, that is, repair the tap by replacing the gasket. Just remember to remove the old one that has stuck to the saddle.
Water trickles out from under the rod
If water drips from under the valve, seals are likely to wear out. There are two ways to fix a tap with a leak from under the rod. For starters, you can try to tighten the head housing more tightly. Do it again with an adjustable wrench. Use of pliers is undesirable, as traces remain after them. Tighten the head as much as possible (just don't overdo it).

If the thread is tightened as much as possible and the water continues to trickle, the gaskets on the gland must be replaced. To do this, first turn the tap to the limit, then again remove the tap head, pry off something sharp and remove both rubber rings, replacing them with new ones.
Water does not overlap
If the gasket is changed, and the water does not overlap, when the tap rotates, the thread breaks, it is necessary to change the stem - the thread on it was worn. There are two options - to replace the stem itself or the entire valve head.

If the thread is not worn, the gasket is new, but the valve is leaking, inspect the seat. A ravine may appear in it. It forms gradually - it is washed out by water supplied with high pressure. If the gasket in some place is pressed loosely, a shell forms in this place. Sometimes water undermines completely the entire circumference, forming sharp edges, which quickly damage the gasket. Ravine and sharp edge must be removed. Take a regular screwdriver and dull the sharp edge along it along the edge. The same operation can be done using a file or a piece of sandpaper with fine grain. The main thing is to achieve a smooth (as possible) and non-sharp edge.
How to fix a cartridge tap
Most often, in the bathroom or in the kitchen they put taps with one lever. From also called flagged or single-lever. For opening / closing water in it, a special device is responsible - a cartridge, because they are also called cartridge.

Inside the cartridge there are two plates with holes. The lower one is fixed rigidly, and the upper one is movable. A rod is attached to it, and it, in turn, is attached to the handle. Turning the handle, we move the rod, and it shifts the movable plate, which opens / closes the water and changes its pressure.
If there is a problem with such a tap, it can only be repaired by replacing the cartridge. The main problem in them is that they begin to flow - water oozes or drips from under the handle. To repair a current or dripping cartridge valve, replace the cartridge. The only way.
Cartridge replacement
The first step is to shut off the water, then remove the handle. To do this, first remove the colored plug - it closes the screw. Unscrewing the screw, the handle is pulled up, separating from the stem. After the handle is removed, unscrew the clamping ring - it holds the cartridge. Now it remains only to take it out.
Then, together with the cartridge, you need to go to a store or market, buy exactly the same. The new one should be the same in size, the holes in its lower part should have the same shape and arrangement. In general, you need to find an exact copy.

Assembly takes place in the reverse order:
- put the cartridge (strictly vertically, scrolling a little around its axis so that the protrusions in the case fall into the recesses on the cartridge),
- tighten the clamping nut;
- install the handle;
- we screw in the fixing screw;
- insert the cap.
An initial check can be done after the pressure ring has been installed. You can open the water and check if the tap is now leaking.
If the water flow has become too weak
Most modern taps are equipped with a spout mesh that retains solid particles that may be contained in the water supply. If gradually the water jet does not become so elastic, and the pressure on other taps has not changed, the reason is the clogging of this mesh. In this case, the crane can be repaired in a couple of minutes.

Unscrew the nut with the grid, which is located at the end of the spout. Rinse it, clean the clogged holes (you can use a needle or an old toothbrush). Replace the cleaned mesh.
When suddenly problems arise with the mixer, this does not mean that you must immediately call the plumbing. You can repair a single lever mixer with your own hands. To do this, you only need to understand the features of this device and have the necessary tools at hand.
Hinged faucet - the best option for kitchen and bathroom
As you know, the mixer is designed to mix cold and hot water and set the desired temperature. One of the most popular models today is the design with one rotary handle. They are called single-command, articulated and even joysticks.
Long service life is associated with the absence of metal rubbing parts. Almost all the wearing elements that are so familiar in a conventional mixer are replaced here with ceramic parts that are machined with great precision. It is only badly affected by abrasive particles. Therefore, newer models often install a filter directly in the mixer itself. But it’s better to ensure good cleaning right at the water inlet.
They are also attractive with their modern design. The case is distinguished by the smoothness of lines and transitions. Chrome, nickel or colored coatings, for example, “black gold”, are often used for their decoration.
With one easy turn, you can adjust both the pressure of the water and the temperature. Simplicity is complemented by reliability and ease of use. Therefore, knowing the device of a single lever mixer, it will be possible to quickly repair it. The main part is the cartridge. Therefore, most often it is necessary to make the replacement of this particular element. But first, you need to figure out what such a device is directly:
- a handle or lever helps provide easy control;
- the adjustment rod is fixed with a nut and washer;
- inside the housing there is a ball valve or ceramic cartridge having three holes. A stable position is due to rubber saddles;
- adjustment and steam cuffs and an adjustment ring are also available.
The causes of malfunctions can be different, but if the cartridge is not damaged, repair of the mixer will not take much time. In part, this will depend on where it was installed.
Single lever mixers - causes breakdowns
Despite the fact that there are two types of faucets, the causes of breakage are often similar, although there is some difference:

- ball shutter is considered more reliable. True, over time, the steel ball corrodes. Teflon seals and gaskets also wear out and then water begins to seep out. They can be quickly replaced. However, if the ball itself is cracked, then you will need to buy a new one;
- disk ceramic cartridge is not afraid of rust and hard water. Such a single lever will last for many years. The design itself consists of thin plates that are carefully adjusted to each other. The gap is hundredths of a millimeter, so trapped debris or grain of sand can cause chips and breakage. In this case, it will also be necessary to make a replacement;
- blockage sometimes leads to deformation of the rubber seat and the shutter itself. Therefore, it will be necessary to disassemble, clean and replace the rubber;
- a loose lever causes water to leak. To stop this, simply tighten all connections well;
- a small crack on the body itself can be repaired with sealant. If this does not succeed, then it is better to find another mixer.
A common cause of malfunctions is the water itself, or rather, its hardness. Even a regular filter for cleaning will allow the single lever to last much longer and without breakdowns.
Mixer Repair: Procedure
Before starting work, it is necessary to close the valves for hot and cold water, after which it is necessary to open the tap and empty the available water. You can also cover the sink so as not to damage it.
The algorithm of actions is as follows:

However, the repair of a single lever mixer with your own hands on this may not be completed. You need to make sure that the cause of the failure has not yet served as any factor.
Mixer - troubleshooting
If, after a major repair, other malfunctions are found that are somehow related to the mixer, then they must be eliminated immediately. Symptoms:

- clogging in the aerator is easy to detect by the different pressure of water in the kitchen or bathroom. You will need to unscrew it and rinse well. If the aerator is very rusty, replace it;
- loud noise after opening the water may appear due to the loose fit of the rubber gaskets. If necessary, it will be necessary to disassemble and trim the rubber again. Installing filters can help eliminate noise;
- a decrease in water pressure occurs due to a blockage in the water pipe or hose itself. In this case, it will have to be cleaned well or replaced with a new polypropylene one;
- frequent problems may occur with the faucet in the bathroom. If the shower hose also suddenly leaks, then this can easily be fixed by changing the gasket. However, the spontaneous lowering of the control lever, which leads to the cessation of water supply through the shower, suggests that, most likely, the matter is in laying the spool. When replacing the upper gasket, you do not even have to remove the mixer. It is only necessary to unscrew the nut and remove the hose. All that remains is to make a replacement and put everything back in place;
- to replace the lower gasket, you will have to shut off the water again. It is necessary to remove not only the hose, but also the adapter along with the spout. Then you need to pull out the switch and the cam, and only then the spool. All that remains is to change the gasket and reassemble the mixer.
If necessary, spare rings can be made of hard rubber 3-4 mm thick.
Therefore, before you yourself need to shut off the water, disassemble this device and make sure the condition of the cartridge or ball valve.
These parts are not repairable, so you should immediately purchase new ones. The main thing is not to make a mistake with the dimensions of the ceramic cartridge. Therefore, it is better to take the old one with you to the store so that an unfortunate mistake does not occur.
The simplicity of the crane design ensures ease of repair. It takes a minimum of time and does not require special skills and knowledge. Nevertheless, one should not rush while working. It is important to do everything according to plan and carefully. As a result, the mixer will last a long time without repair.
Spanking sounds are repeated monotonously and inevitably, with the accuracy of a metronome, taking the brain and money directly to the sink. The reason is simple and banal - a faucet is dripping in the kitchen or in the bathroom.
The situation is simple and familiar to everyone, such breakdowns are far from uncommon and this situation is fraught with many troubles. Starting from the risk of pouring neighbors from below and ending with the growth of water bills.
Permanent control over the operation and condition of plumbing equipment, as well as careful observance of operating rules, helps to avoid such phenomena.
A kitchen faucet is not a very complicated technical product, but it still functions under pressure. Despite the apparent simplicity of this mechanism, it needs increased attention.
Consider the reasons why it can drip from the mixer in the kitchen
- Improper use. Any equipment has certain operational characteristics. Providing a guarantee for their products, each manufacturer stipulates it with a number of restrictions, violation of which leads to accelerated wear and damage. And often to execute them or to control the specified parameters is almost impossible.
- Poor workmanship or poor quality materials. Often, making a certain purchase, a person tries to choose an inexpensive product, trying to use financial resources economically. But often this results in not just inconvenience, but a direct loss of money in the event of a forced replacement of defective goods. Especially unpleasant are cases when the breakdown occurs in the absence of people. When purchasing a faucet for your apartment, it is better to pay for the brand, because this concept also includes such an indicator as product quality. However, the low cost of a popular brand should alert - most likely, this is a low-quality fake.
- Natural wear associated with long-term use. Cranes open and close multiple times during the day, its locking parts (gaskets, axle boxes, cartridges) work intensively and quickly wear out. Therefore, the best way to avoid leaks is the timely forced replacement of quickly wearing parts.
- One of the reasons for the breakdown may be poor build quality. The most typical errors are misalignment of parts, destruction of seals due to too tight tightening. Factory rejects cannot be ruled out, so a thorough inspection upon purchase is required.
What to do when a faucet drips in the kitchen?
First of all, you need to establish the reason for which the mixer is dripping in the kitchen and decide on the possibility of its independent elimination. If the damage can be repaired by yourself, then in this case you need to go to the plumbing store to purchase the necessary parts and proceed to fix the defect with your own hands.
Watch the video - the mixer is dripping in the kitchen, how to fix it yourself
Knowing how to repair a dripping faucet in the kitchen will allow you to have everything you need in stock and not arrange a race for the little things.
How to fix a single lever mixer in the kitchen
Mechanisms of this type are most popular with consumers, since they are quite reliable and simple in design. The regulating element is a non-collapsible cartridge.
The need for repair occurs after the pressure of the water flowing from the spout has decreased, or a leak is observed in the off state. Why does the tap drip when the water is off? This clearly indicates that the locking elements are worn out.
 The diagram given here can only be considered as a typical one, units of various brands can have quite significant differences. But common to all is the cartridge fixing nut, which is held by a functional lever.
The mount is hidden by a decorative overlay on the body. It must be pry off with a screwdriver and removed, after which you can remove the cartridge and replace it with a new one.
If there is a leak between the mixer body and the sink, this indicates a defective sealing ring between them. Unscrew the housing, remove the ring and replace with a new one.
Basically, this is all you need to know about how to fix a dripping single lever tap. But, given the differences in the designs of the models, you must first study the instructions that are attached to a particular product.
How to fix a ball mixer
Ball valves are the second most common after single lever.
 The reason for this is their durability and ease of use. Their construction uses high-strength materials that determine the long life.
The main "enemies" of the ball valve are pollution, which is always in the water. Their sources are insoluble salts or oxides. Therefore, for them interacting, water must pass through several filters.
The first is a coarse filter. It consists of a housing in which a brass mesh is placed. Such an element delays most of the constituents of solid inclusions. The grid needs to be periodically cleaned of sediment, it can become clogged until complete obstruction.
Before demanding clean water devices from household appliances, fine filters are also installed that pass only microscopic precipitation through themselves.
 If a ball valve is dripping, proceed as follows:
- Release the screw securing the handle.
- Remove it from the shaft.
- Using a screwdriver, unscrew the threaded screw.
- Remove the cover and sealing plastic element.
- Inspect and clean the gasket for contamination, if necessary, in case of significant wear - replace with a new part.
- Remove and inspect the locking element - the ball, if necessary, replace it.
- Use a thin screwdriver or tweezers to remove the seals that hold the ball, it is better to replace them forcibly.
Watch the video - dripping in the kitchen, how to fix any mixer
When reassembling, grease all contact parts with silicone grease for better sealing.
TIP! If a ball valve is dripped in the kitchen, it is better to replace it with a new one. Despite the simplicity of the design, such a product is difficult to repair due to the high requirements for precision assembly.
How to fix valve taps
Locking devices of this type are the cheapest to repair, but they need it much more often. This is due to the material used for sealing - rubber.
It is used both for sealing glands and for locking elements. Recently, silicone seals have been installed, which give a positive operational effect, but the service life from this has not changed much.
Two main types of valve taps are used: worm and ceramic axle boxes.

 The first of them is equipped with a thread on a movable stem. When the rod rotates, it moves forward and, through the hexagon, presses the rubber gasket to the seat on the crane body.
This is where the weak spot is. With excessive force, the gasket quickly fails. Therefore, such a product requires very careful handling.
Additional stuffing box gaskets are installed on the valve stem itself, isolating it from the body.
It should be noted that the longevity of the locking device is very limited, so when buying the axle box, you must immediately purchase spare gaskets and seals.
A later design solution for the crane - axle boxes is the use of ceramic inserts. In such a device, translational movement of the rod does not occur. It uses two ceramic washers with oppositely directed notches in the form of semicircles.
When the flywheel is rotated, the axle boxes and holes are combined to open a passage for water, or they mutually overlap, blocking it. Sealing of the half rings among themselves is done by a rubber shock absorber.

Given the high wear resistance of ceramics, this design solution was very successful and successfully applied. Well, if you instilled a ceramic tap, then for repairs you need to change the insert and shock absorber.
Watch video - faucet repair or why it drips (flows) in the kitchen
Before you repair a two-valve dripping tap, you must turn off the water on the riser or on the corresponding branches of the cold and hot water collector. Further:
- It is necessary to remove the decorative trim on the handwheel, carefully prying it with a narrow screwdriver.
- Release screw, remove handwheel.
- Carefully loosen and remove the packing nut.
- Unscrew stem with rubber gasket.
- Clean valve seat from contamination.
- Change rubber gasket.
- Assemble in the reverse order, after which you can open the water.
Elimination of leaks due to other reasons
The main thing to do if a faucet is dripping in the kitchen is to correctly determine the cause of the leak. Knowing where the leak comes from will greatly facilitate the repair work, and most likely will make it cheaper, since unreasonable disassembly of the plumbing fixture most often leads to damage to the seals.
Watch the video - how to fix a dripping faucet in the kitchen
Most often, the following circumstances become the reason why the mixer tap is dripping:
- leak at the drain;
- poor condition of the gasket between the spout and the tap;
- leakage between the sink and the mixer;
- dripping directly from the tap itself.
Water leakage from the valve, as a rule, indicates increased wear on the gaskets, which must be replaced.
Leakage may occur at the point of contact of the landing circuit of the mixer with the plane of the sink. This can be due to a careless sharp blow to the mixer body, which results in a crack in the gasket, especially if it is old.
If dripping at the spout, pay attention to the condition of the taps and replace all seals. As a result of wear and aging of materials, leakage occurs.
Watch the video - how to fix the axle box yourself on the mixer
When a faucet flows in the kitchen or in the bathroom, before repair,. Exceeding the pressure above 4.5 atmospheres often causes leaks in the valves.
Any repair should be started by turning off the water supply to the riser.
Selection and operation of a kitchen faucet
Breakdowns in the water supply system occur with enviable regularity, and the reason for this may be the lack of proper regular care for it. And above all, the control over the operation of the water supply system is important.
The system works stably only at a stable pressure, sudden changes destroy it, and gaskets and threaded connections of locking devices are the first to suffer.
Watch the video - which mixer to choose in the kitchen
Of great importance is the initial quality of the crane. First of all, the material of manufacture. A good faucet or mixer is made of heavy alloys - brass or bronze, they are easy and simple to fix. Materials such as silumin are absolutely unsuitable for plumbing, although it is often used by unscrupulous manufacturers.
In operation, single-lever devices are convenient, which can be controlled with one hand. Avoid the purchase of products from manufacturers in China and Turkey - they traditionally do not differ in quality and durability and begin to leak immediately after installation.
The water supply system in an apartment or in a private house is a source of increased danger. Therefore, during its operation, it is necessary to adhere to certain rules to avoid problems. Let's list them:
- Have the ability to quickly disconnect water from the riser.
- The repair tool kit must always be at hand.
- It is necessary to keep in the house a set of interchangeable components for taps and faucets that are in use.
- Be prepared for an emergency call of emergency water utility services in case of a serious accident.
- And, of course, you need to know the rules and procedures for self-management of an emergency.
Probably, each of us should know how to fix a water tap. Moreover, in most cases, the malfunction can be eliminated quite quickly and without unnecessary costs, but you need to expect a call to the master for more than one hour, and he will take a lot of money for the work.
In our article, we will talk about the most common breakdowns of water taps, after which we present the repair algorithms for most models.
Major malfunctions
Before repairing a faucet-faucet, it is worth taking time to analyze the situation. So we can understand what kind of actions it is worth taking, thereby saving a lot of time.

The list of breakdowns includes the following items:
| Breakage | Description |
| When the valve is closed, drops of water flow from the tap | The locking mechanism comes into disrepair. To fix the problem, you must either replace the element responsible for closing the tube clearance, or install new sealing gaskets. |
| Water drips at the point where the spout, hose or valve is connected | Leaky connection. You can restore either by replacing the gasket, or by installing a plumbing winder on the thread. |
| The flywheel scrolls | The flywheel housing has jumped off the rod or the rod has failed. In the first case, it is enough to install the part in place, in the second - it is necessary to replace the locking element. |
| During operation, the crane beeps | The gasket has worn out and its edges begin to vibrate under the pressure of the water. Usually, to eliminate extraneous sounds, it is enough to replace the gasket. |
| Leakage on body or spout | The integrity of the product is violated. Temporarily it is possible to seal with the help of "cold welding", but at the first opportunity it is worth replacing the valve. |
| Spray is flying from the aerator; water flow is difficult. | The aerator grill is clogged and needs to be cleaned. |
In principle, this table describes the main problems. Other situations that may arise during the operation of the crane are derived from those already analyzed, and therefore they need to be repaired using a similar algorithm.

Also, before starting work, you should carefully familiarize yourself with the design features of your model. As a rule, the assembly drawing of a water tap is included with the product itself, therefore, when installing a new mixer, this document should be saved.
Note!
If you couldn’t find the scheme, then you should enter in the search engine the query “assembly drawing method for indicating a water tap” and select your model.
Most manufacturers upload technical documentation to the network, so the chance to find what you need is very high.
Now we will try to figure out what to do in each case. And let's start with the most common situation, namely, eliminating the causes of leakage of the locking element.

Box models
Replacement axle boxes
Cranes with axleboxes as shutoff valves are the easiest to repair.
The action algorithm here is as follows:
- Before disassembling the water tap, be sure to block the water on the riser.
- Remove the trim from the flywheelunder which the fixing screw is located.
- using a screwdriver, after which we remove the flywheel from the guides.
- We dismantle decorative conescovering the mounting location of the axlebox.
- Using an adjustable wrench, we unscrew the worn out axle box from the socket. We clean the cavity from the sediment and blot it with a rag, removing the remaining water.

- We put in place a new axle boxby screwing it in a thread. In this case, you do not need to make excessive efforts so as not to damage the structure.
- Next we need to check the tap for leaks. Turn on the water on the riser and inspect the installation site of the axle box.
- Grasping the rod with pliers, rotate it several times. The water flow should turn on and off quickly and clearly.
- Build in reverse orderby installing decorative cones and fixing the flywheel to the crane.
Repair axle boxes
In some cases, the axle boxes can be repaired. It all depends on their design.

Products with a rubber gasket are more maintainable:
- Unscrew the screw securing the gasket on the end with a screwdriver.
- Dismantle the sealing element and install in its place a new, appropriate size.
- We fix the gasket with a screw, clamping it tightly enough, but without deformation.
With ceramic axle boxes it will be a little more complicated:
- Remove the rubber seal from the end, and then remove the end cap.
- We dismantle the ceramic plates, if necessary, unscrewing their fixing element.
- We clean the inner cavity of the axle box, removing dirt that can lead to leaks.

- We return the plates in place, observing the correct position: when turning the rod, they should completely block the hole, interrupting the flow of water.
- We complete the assembly by replacing the dismantled elements.
Note!
Often the cause of the leak is the wear of the ceramic plates themselves, so they may need to be completely replaced.
And to find these parts is quite difficult, and the price of the repair kit will not be much less than the cost of a new axle box.
Ball and cartridge models
Crane disassembly
The device of the water tap and mixer, which is controlled by one lever, differs from the axle box construction.
Accordingly, the dismantling of such a product for repair must be performed according to another scheme:

- First, raise the red-blue pad on the front panel.
- A screw for a Phillips screwdriver or a hexagon is usually located under the pad - we unscrew it.
- Next, remove the handle, carefully disconnecting it from the stem of a ball or cartridge locking mechanism.
- The next step is to provide access to the fixture itself. To do this, unscrew one or two nuts.
Note!
Very often, manufacturers make an internal, fixing nut with grooves for a special tool.
You can either purchase a similar wrench, or try to unscrew the part yourself, using improvised tools.

Having removed the nut, we gain access to either the cartridge or the ball valve. They are dismantled quite simply, and replacement will not cause difficulties.
Replacing locking and sealing elements

To restore the functionality of a single lever mixer, most often you need to completely change the functional element.
- The cartridge is removed from the slot by pulling it vertically up the guides. When the part is skewed, you can correct its position with a slight side impact.
- The cavity under the cartridge is cleaned of rust and debris, which can cause leakage.
- We install a new cartridge, fix it with one nut and check how well it covers the water. If there are no leaks, and the adjustment works properly, we assemble the mixer.

Ball valves have their own characteristics. Their main advantage is that the ball itself breaks extremely rarely, because repairs usually consist of replacing gaskets. We act like this:
- Holding the rod, we take out the ball from the socket.
- Using tweezers or small pliers, we remove the spring-loaded gaskets that press the ball to the body.

- We replace the gaskets, and then set the ball in place.
- We put a new sealing ring on top and clamp the valve.
- As in previous cases, it is better to check the tightness of the structure until complete assembly.
Other repairs
Minor troubleshooting
In addition to actually repairing the locking mechanism, in order to restore the crane's working capacity, other measures are sometimes necessary.
For example, in case of problems with the aerator, we act as follows:

- Using an adjustable wrench with plastic pads, gently grab the aerator and unscrew it from the spout.
- We take out the installed mesh and carefully rinse it, removing all dirt.
- In parallel, a flexible brush, trying to remove the stratification from the inner walls.
- We wind the aerator onto the spout, making sure that the thread does not warp.
If a leak occurs at the fixation point of the swivel spout, proceed as follows:
- Gently twist the union nut using an adjustable wrench. Remove the gander.
- We remove the rubber gasket from the socket.
- In its place, install a new one. The diameter and thickness of both elements must match.
- We return the spout to its place, fixing it with a union nut.

Coverage recovery
Some problems do not affect the operation of the mixer, but significantly impair its appearance. As a rule, these include scratches, chips, abrasions, etc. And although the full restoration of chromium plating or nickel plating is quite expensive, it is not necessary to throw out a tap and buy a new one.
You can return an attractive appearance to a product by painting:

Note!
If the scratches are minor, then such polishing can also be applied without painting: it well restores factory chromium / nickel plating.
- After polishing is completed, we assemble the crane and install it in place.
Conclusion
Repair of the faucet and mixer can be carried out according to different schemes. It all depends on how well we analyze the breakdown and what decision we make at the planning stage. You can learn about troubleshooting operations by watching the video in this article.